
Hello friends, today I will let you know about the SQL Server Instance and SQL Server Alias creation and configuration. When I saw first time, I was confused about
- What is SQL Server Instance and SQL Server Alias?
- Why we are using SQL Server Instance and SQL Server Alias?
- How to create and configure them?
- I will try to solve above questions. Let’s Start,
Client applications connect to an instance of Microsoft SQL Server to work with a SQL Server database.
When you are going to install SQL Server, you have to select options for SQL Server Instance:
An instance is either the default, unnamed instance, or it is a named instance.
SQL Server Default Instance
When SQL Server is installed in the default instance, it does not require a client to specify the name of the instance to make a connection. The client only has to know the server name.
MY-MACHINE-NAME /* unnamed version (default instance) */
SQL Server Named Instance
A named instance is identified by the network name of the computer plus the instance name that you specify during installation. The client must specify both the server name and the instance name when connecting.
MY-MACHINE-NAME\MSSQLSERVER /* named version */
How to make decision which to do:
- You can install only one default instance but can install multiple named instances. It is good to install only a default instance unless you have a special need to install multiple SQL Server instances on the same host, such as running different versions concurrently or other isolation requirements. These additional instances must be named.
- The underlying difference between a default and named instance is mostly a matter of network connectivity. Clients can connect to the default instance using only the host name over the well-known 1433 port. To connect to a named instance, clients specify the host and instance name (e.g. ” MY-MACHINE-NAME\MSSQLSERVER”) and the SQL Server Browser service returns the port the named instance is listening on.
Now Let go on SQL Server Alias:
A SQL Server alias is simply a friendly name or nick name, configured on the client computer that points at a SQL Server instance. This instance can either be installed locally or on a different machine on the network.
So if my SQL Server Alias name is “DevelopmentDB”,
Then you can say for SQL Server Named Instance, “MY-MACHINE-NAME\MSSQLSERVER” = “DevelopmentDB”
Note: For that we need to configure the SQL Server Alias on the SQL Server, after that we can use the SQL Alias name instead of the SQL Server Instance name.
SQL Server Alias Creation Steps:
Step 1: Run the SQL Server Configuration Manager, Programs -> Microsoft SQL Server 2012 -> Configuration Tools

SQL Server Configuration Manager
Step 2: Verify the SQL Server (MSSQLSERVER) Service is running under the SQL Server Service option.

Step 3: Verify the TCP/IP Protocol is enabled for the SQL Native Client 11.0 Configuration (32bit) and SQL Native Client 11.0 Configuration tree.
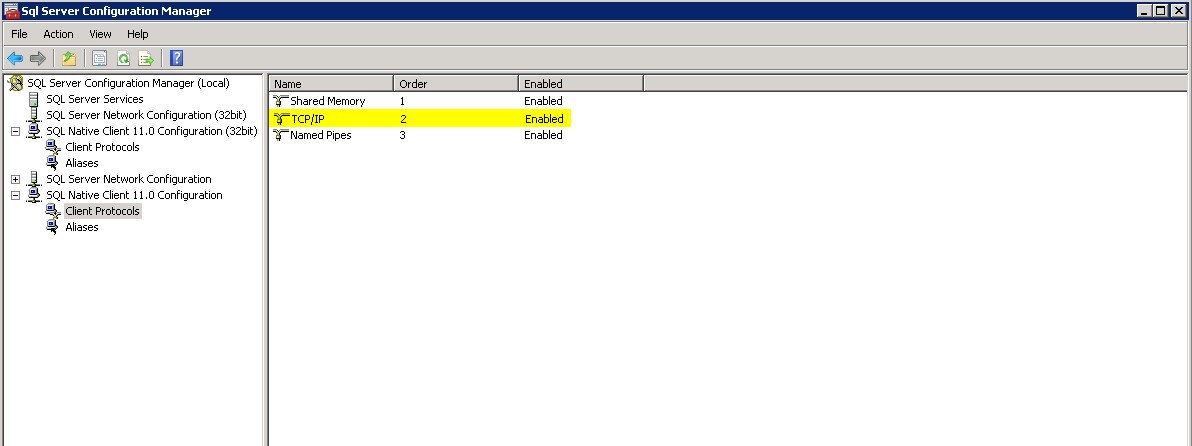
SQL Server Configuration Manager
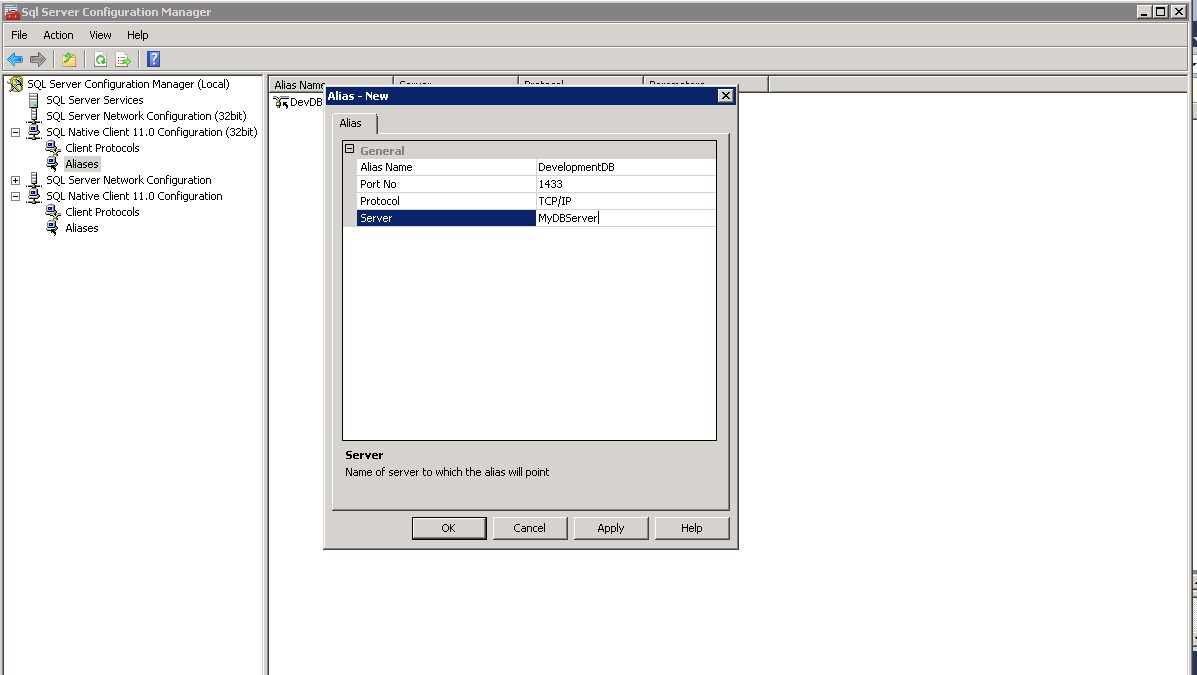
Step 4: Create the new alias, Right click and select new alias under Aliases of SQL Native Client 11.0 Configuration (32bit) and tree.
In New Alias Creation Dialog,
• You have to set the protocol to TCP/IP,
• Port no, by default SQL Server uses 1433 port number. You can also specify other port number as well.
• Server name: SQL Server Instance Name as discussed above (default Instance or named instance)
• I have default Instance named “MyDBServer”.
• New alias name is “DevelopmentDB”
So Now, “DevelopmentDB” alias uses “MyDBServer”, port no “1433” and “TCP/IP” protocol to connect to the SQL Server Instance over the network
SQL Server Alias – 32bit
SQL Native Client 11.0 Configuration-32bit(a)

SQL Server Alias
SQL Native Client 11.0 Configuration(b)
Step 5: We have completed the create alias process. For the verification open SQL Server Management Studio and try to connect with SQL Server using newly created alias name “DevelopmentDB”. If everything configuration is fine, then it will connect to SQL Server:

SQL Server Management Studio
This is the scenario where you have one machine or server and you have successfully created SQL Server Alias.
One more beneficial use of SQL Server Alias is for the multiple servers’ environment like SharePoint Multiple Server Farm.
Assume, we have two servers
- Database Server: MyDBServer
- SharePoint Server: MySPServer
SQL Server is not installed on “MySPServer” server. But still we can use the SQL Server Instance of the “MyDBServer” using the alias configuration on “MySPServer” sever
Below Configuration, We have to do on the SharePoint Server “MySPServer” to connect to the SQL Server of “MyDBServer”.
We have already created alias named ”DevelopmentDB” on the server “MyDBServer”.
Now we have to configure SQL Server alias on the “MySPServer” server as below:
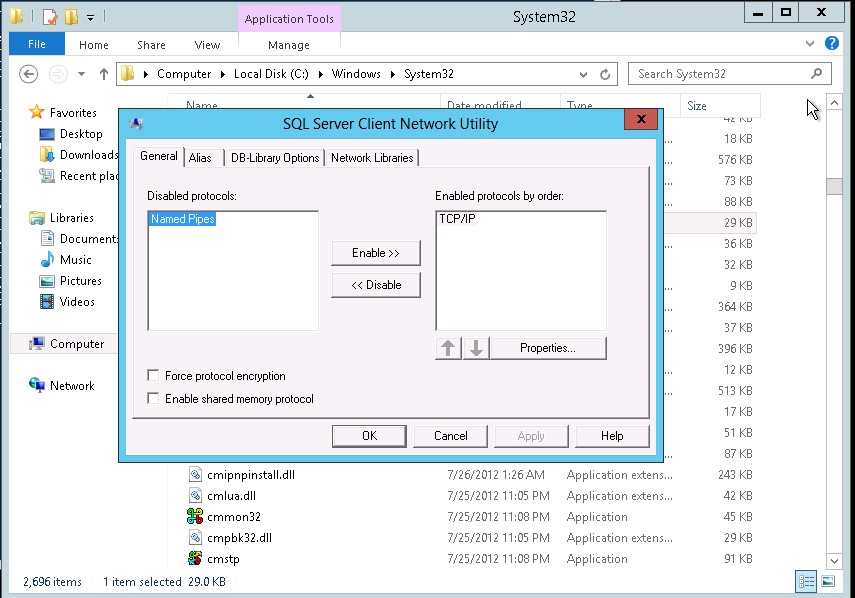
Step 1: If you haven’t installed the SQL Server 2012 client tools, you can still create an alias using the SQL Server Client Network Utility. To bring up the utility, click on Start, then run, and run cliconfg.exe.
Or you can open it form C:\Windows\System32\cliconfg.exe

Cliconfg
Step 2: Below view of SQL Server Client Network Utility, Enable the TCP/IP protocol from the General Tab,
SQL Server Client Network Utility
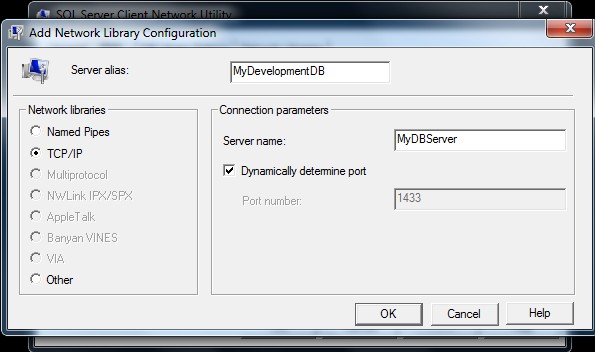
Step 3: Go to the Alias Tab to create a new alias, click on the Add… button.
“Add Network Library Configuration” view,
Server Alias is what the application will attempt to connect. I have already created that alias on SQL Server named “MyDevelopmentDB”
Server Name: Real Server Name, in our case server name is “MyDBServer”
Port Number: 1433 (Configured as before)
Click on apply and OK to create new SQL Server Alias on “MySPServer’ server
Network Library Configuration
One more thing we need to take care is about the Port Number.
Open the Port for Inbound Connection if Enable Firewall
When we configure the port number for SQL Server Alias Name then server does not allow the out side server connection on this port because of the Firewall Settings.
So our next step is open the custom port for inbound connection if firewall is enabled.
Create a new Inbound rule for allowing the connection for alias port (in my case it is 1433)
Step 1: Open Windows Firewall with Advance Security from the Control Pannel. Click on the “New Rule” of Inbound Rules Tab. Select the Rule Type as “Port”. Click Next.

Firewall Settings
Step 2: Domain Rule apply for To TCP and Provide the specific port number (1433). Click Next.

Firewall Setting for Port
Step 3: Apply the Rule on the Profile, Click Next and allow the connection.

Firewall Setting for Port

Firewall Setting for Port
Step 4: Provide the name of the inbound rule, Click Finish.

Firewall Setting for Port
Now while creating the new farm, provides the SQL Client Alias named “DevelopmentDB” instead of the SQL Server Instance name of “MyDBServer”. So All database for the SharePoint Configuration will be created on the SQL Server of the “MyDBServer”
Let me know if you have any suggestions or questions.
Thank you…

Very Helpful article!
LikeLiked by 1 person
Thanks meet…
LikeLike
Greatful info. Saved my hours. Thanks a lot…
LikeLiked by 1 person
Thanks for your compliment…
LikeLike
Hi,
I installed SQL server with named instance “SQLSERVER2008R2” I followed the same steps but i’m not able to connect using alias name. Any reason?
Thanks
Gopi
LikeLike
Hello, Can you please re-check the step 4 of SQL Server Alias Creation Steps. Over there, you have to provide proper server name while creating new alias. Your SQL Server named instance is “SQLSERVER2008R2”. So you have to provide the Server Name as “MachineName\SQLSERVER2008R2” and create new alias for 32 and 64 bit SQL Native Client 11.0 Configuration.
LikeLike
Pingback: SharePoint 2010/2013 Single-Multi Server Installation using AutoSPInstaller | Code Creature
Do you have to perform CliConfg setting changes on all the web and app servers for a multi server install?
LikeLike
Yes. You have to perform the same Cliconfig setting changes on all SharePoint WFEs and Application Servers.
LikeLike
Thank you.
LikeLike
Hello I followed your steps and its working.But have one query, when we create alias have any option that remove the old sql server setup from SP farm and only take new sql server instance running?
LikeLike
Pingback: SharePoint 2010/2013 Single-Multi Server Installation using AutoSPInstaller | SharePoint Interests
Pingback: Create and Configure SQL Server Alias for SharePoint Installation | SharePoint Interests
Do we need to set rules for inbound connections on all the web and app servers?
LikeLike
Yes.
LikeLike
Pingback: SharePoint 2010/2013 Single-Multi Server Installation using AutoSPInstaller | SharePoint Interests
You ought to experience a tournament for just one of the most useful blogs on the web. I’ll recommend this web site!
LikeLike
Thank you 🙂
LikeLike
Great article! My understanding is that when creating the aliases on the “MySPServer” using cliconfg.exe, you need to do this using C:\Windows\System32\cliconfg.exe for 32-bit, and C:\Windows\SysWOW64\cliconfg.exe for 64-bit.
LikeLike
Yes. You are right!
LikeLike
Pingback: Create and Configure SQL Server Alias for SharePoint Installation | SHAREPOINT
Pingback: Create and Configure SQL Server Alias for SharePoint Installation | RAMESH@SHAREPOINT
Pingback: RAMESH@SHAREPOINT
Pingback: Move SharePoint Database and SQL Client Alias | RAMESH@SHAREPOINT